Save Time in Processing Requests (Body) in Spring Boot (Kotlin)
09-10-2025
In the team, we are working on a part of the REST API to be able to reconcile new data against a previous version and thus generate a new one, what we call snapshotting. This is because we are interested in having the ability to analyze how they have evolved and where that data came from. In a first version, we saw that there was a lot of manual validation and data mapping (serialization) code, and we realized we could avoid it if we used the capabilities that Spring Boot offers together with Kotlin. In this way, we can save development and maintenance time, while ensuring a simpler design suited to the needs, along with a declarative approach. This article is a summary of what I have learned by making a comparison with Java. I hope it will be very useful for you to speed up development with automatic serialization and validation in cases where there is no complex domain (complex business rules or invariants to maintain), but rather to ensure that incoming data complies with certain basic range or format rules.
1. Data Class: The Natural Replacement for Java Records
In Java, we use record to create immutable classes that only contain data. In Kotlin, the equivalent is the data class. With just a few lines of code, in both, the compiler automatically generates the equals(), hashCode(), toString(), and copy() methods, perfect for the task of a DTO.
The biggest difference and a great advantage is type safety and nullability (in this article I covered this topic in detail). In Kotlin, a variable cannot be null unless you explicitly indicate it with a question mark (?). This prevents deserialization errors and NullPointerException when processing JSON.
-
val name: String→ Cannot be null. -
val name: String?→ Can be null.
For more information: Check the official Kotlin documentation on data class.
2. JSON Mapping: When the Name is Different
Sometimes, the field names in the JSON you receive do not match the camelCase convention we use in Kotlin (for example, if it uses snake_case). To solve this, we use the @JsonProperty annotation from the Jackson library, which Spring uses by default for mapping.
Example:
data class Data(
    @JsonProperty("some_data") val someData: Double,
    @JsonProperty("other_data") val otherData: Double
)
For more information: Check out this article JsonIgnore, JsonProperty, and JsonAlias – Data Access with Quarkus – makigas.
3. @param vs. @field: The Secret Behind Annotations
To apply the annotation correctly, we sometimes need to specify the use-site target. The difference lies in which part of the code the annotation is applied to:
@param:applies to the constructor parameter. It is the preferred way for immutable properties (val), as it ensures that the value is assigned only during object creation.
data class UserProfile(@param:JsonProperty("user_name") val userName: String)
In this case, @param:JsonProperty tells Jackson to use the constructor to map the user_name field from JSON to the userName property.
@field:applies to the underlying field that Kotlin creates internally. This is less common for DTOs and can break the immutability ofval, as it allows the library to inject the value directly.
data class UserProfile(@field:JsonProperty("user_name") val userName: String)
Here, Jackson tries to access and modify the field directly, which is less safe with immutable properties.
For more information: Check the official Kotlin documentation on annotation targets.
4. Automatic and Robust Validation
Spring Boot has the capability to validate DTOs declaratively using annotations from the Jakarta Bean Validation standard.
Here are the key pieces:
-
Annotations on the DTO: You use annotations like
@DecimalMin("0.0")and@DecimalMax("100.0")to define rules on the properties. -
@Validin the Controller: In your controller method, you place the@Validannotation next to@RequestBody. This tells Spring to validate the DTO before executing your code.
import jakarta.validation.Valid
import org.springframework.web.bind.annotation.PostMapping
import org.springframework.web.bind.annotation.RequestBody
import org.springframework.web.bind.annotation.RestController
import org.springframework.http.ResponseEntity

@RestController
class DataController {
    @PostMapping("/some")
    fun saveData(@Valid @RequestBody data: Data): ResponseEntity<String> {

        // Your business code here. You know the data is valid!

        return ResponseEntity.ok("Data received and validated successfully!")
    }
}
For more information: Check the Java Bean Validation guide in the documentation.
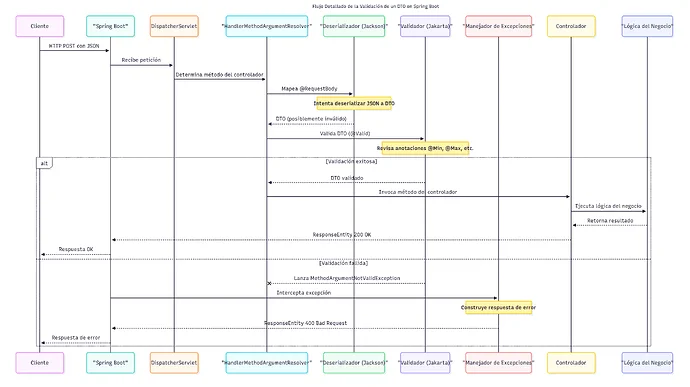
5. The Validation Flow: From Request to Bad Request
The validation process is a “middleware” that intercepts the request before it reaches your method.
-
HTTP Request: A client sends the request with a JSON body.
-
Spring Boot: Receives the request and directs it to your controller.
-
Annotations: Spring detects
@RequestBodyand@Valid. -
Validation: If the JSON does not meet the rules, the Validator throws a
MethodArgumentNotValidException. -
Exception Handling: Spring Boot has a default handler that catches this exception and generates an
HTTP 400 Bad Requestresponse, informing the client about the error.
Your controller method will only execute if the data is valid, keeping your business logic clean and free of manual validations.
For a visual detail, you can see the following sequence diagram:
Conclusions
By introducing Kotlin, I've seen that it is necessary to better understand how the magic of Spring Boot works to correctly use Kotlin's data classes. Additionally, adopting the non-defensive internal perspective in the system, i.e., validating at the boundary, Java Bean Validation allows this to be done very simply and declaratively, saving development time and tests to maintain while ensuring a simpler design.
